How to install OpenLiteSpeed and PHP 7.2/7.1/7.0/5.6 from LiteSpeed Repositories on Centos 7/6
We’re going to install OpenLiteSpeed on centos 7/6 server from litespeed repo. OpenLiteSpeed is the Open Source edition of LiteSpeed Web Server Enterprise. Both servers are actively developed and maintained by the same team, and are held to the same high-quality coding standard. OpenLiteSpeed contains all of the essential features found in LiteSpeed Enterprise, and represents our commitment to support the Open Source community. It is recommended to use Centos 7/6 for OpenLiteSpeed for stability.
Some Features :
Event-Driven Architecture
Fewer processes, less overhead, and enormous scalability. Keep your existing hardware.
Upgrade from Apache
OpenLiteSpeed is mod_rewrite compatible, so you can continue to use your current rewrite rules.
Friendly Admin Interfaces
OLS comes with a built-in WebAdmin GUI. Control panel support is available with CyberPanel.
Built for Speed and Security
Features Anti-DDoS connection and bandwidth throttling, ModSecurity v3 integration, and more.
Intelligent Cache Acceleration
Built-in full-page cache module is highly-customizable and efficient for an exceptional user experience.
PageSpeed Optimization
Automatically implement Google’s PageSpeed optimization system with the mod_pagespeed module.
PHP LiteSpeed SAPI
Native SAPI for PHP allows external applications written in PHP to run up to 50% faster.
One-Click Installation
Install OpenLiteSpeed, MariaDB and WordPress on various operating systems with just one click.
WordPress Acceleration
Experience a measurable performance boost with OpenLiteSpeed and LSCache for WordPress.
STEP 1
Install repo :
CentOS 6:
yum install epel-release
rpm -ivh http://rpms.litespeedtech.com/centos/litespeed-repo-1.1-1.el6.noarch.rpm
CentOS 7:
yum install epel-release
rpm -ivh http://rpms.litespeedtech.com/centos/litespeed-repo-1.1-1.el7.noarch.rpm
STEP 2
Ensure you’ve removed any other http server (apache,nginx)
Install Latest/recent version of OpenLiteSpeed From yum :
yum install openlitespeed
STEP 3
Install PHP from litespeed repository :-
Install dependencies :
yum -y install gcc make gcc-c++ cpp kernel-headers.x86_64 libxml2-devel openssl-devel bzip2-devel libjpeg-devel libpng-devel freetype-devel openldap-devel postgresql-devel aspell-devel net-snmp-devel libxslt-devel libc-client-devel libicu-devel gmp-devel curl-devel libmcrypt libmcrypt-devel pcre-devel sqlite-devel db4-devel enchant-devel libXpm-devel mysql-devel readline-devel libedit-devel recode-devel libtidy-devel libtool-ltdl-devel
To install PHP 7.2 :
This command will install php 7.2
yum install lsphp72 lsphp72-bcmath lsphp72-common lsphp72-dba lsphp72-dbg lsphp72-devel lsphp72-enchant lsphp72-gd lsphp72-gmp lsphp72-imap lsphp72-intl lsphp72-json lsphp72-ldap lsphp72-mbstring lsphp72-mysqlnd lsphp72-odbc lsphp72-opcache lsphp72-pdo lsphp72-pear lsphp72-pecl-apcu lsphp72-pecl-apcu-devel lsphp72-pecl-apcu-panel lsphp72-pecl-igbinary lsphp72-pecl-igbinary-devel lsphp72-pecl-mcrypt lsphp72-pecl-memcache lsphp72-pecl-memcached lsphp72-pecl-msgpack lsphp72-pecl-msgpack-devel lsphp72-pecl-redis lsphp72-pgsql lsphp72-process lsphp72-pspell lsphp72-recode lsphp72-snmp lsphp72-soap lsphp72-tidy lsphp72-xml lsphp72-xmlrpc lsphp72-zip
Then we need to symlink the lib folder
ln -s /usr/local/lsws/lsphp72/lib64 /usr/local/lsws/lsphp72/lib
To install PHP 7.1 :
This command will install php 7.1
lsphp71 lsphp71-mcrypt lsphp71-bcmath lsphp71-common lsphp71-dba lsphp71-dbg lsphp71-devel lsphp71-enchant lsphp71-gd lsphp71-gmp lsphp71-imap lsphp71-intl lsphp71-json lsphp71-ldap lsphp71-mbstring lsphp71-mysqlnd lsphp71-odbc lsphp71-opcache lsphp71-pdo lsphp71-pear lsphp71-pecl-apcu lsphp71-pecl-apcu-devel lsphp71-pecl-apcu-panel lsphp71-pecl-igbinary lsphp71-pecl-igbinary-devel lsphp71-pecl-mcrypt lsphp71-pecl-memcache lsphp71-pecl-memcached lsphp71-pecl-msgpack lsphp71-pecl-msgpack-devel lsphp71-pecl-redis lsphp71-pgsql lsphp71-process lsphp71-pspell lsphp71-recode lsphp71-snmp lsphp71-soap lsphp71-tidy lsphp71-xml lsphp71-xmlrpc lsphp71-zip
Then we need to symlink the lib folder
ln -s /usr/local/lsws/lsphp71/lib64 /usr/local/lsws/lsphp71/lib
To install PHP 7.0 :
This command will install php 7.0
lsphp70 lsphp70-mcrypt lsphp70-bcmath lsphp70-common lsphp70-dba lsphp70-dbg lsphp70-devel lsphp70-enchant lsphp70-gd lsphp70-gmp lsphp70-imap lsphp70-intl lsphp70-json lsphp70-ldap lsphp70-mbstring lsphp70-mysqlnd lsphp70-odbc lsphp70-opcache lsphp70-pdo lsphp70-pear lsphp70-pecl-apcu lsphp70-pecl-apcu-devel lsphp70-pecl-apcu-panel lsphp70-pecl-igbinary lsphp70-pecl-igbinary-devel lsphp70-pecl-mcrypt lsphp70-pecl-memcache lsphp70-pecl-memcached lsphp70-pecl-msgpack lsphp70-pecl-msgpack-devel lsphp70-pecl-redis lsphp70-pgsql lsphp70-process lsphp70-pspell lsphp70-recode lsphp70-snmp lsphp70-soap lsphp70-tidy lsphp70-xml lsphp70-xmlrpc lsphp70-zip
Then we need to symlink the lib folder
ln -s /usr/local/lsws/lsphp70/lib64 /usr/local/lsws/lsphp70/lib
To install PHP 5.6 :
This command will install php 5.6
lsphp56 lsphp56-mcrypt lsphp56-bcmath lsphp56-common lsphp56-dba lsphp56-dbg lsphp56-devel lsphp56-enchant lsphp56-gd lsphp56-gmp lsphp56-imap lsphp56-intl lsphp56-json lsphp56-ldap lsphp56-mbstring lsphp56-mysqlnd lsphp56-odbc lsphp56-opcache lsphp56-pdo lsphp56-pear lsphp56-pecl-apcu lsphp56-pecl-apcu-devel lsphp56-pecl-apcu-panel lsphp56-pecl-igbinary lsphp56-pecl-igbinary-devel lsphp56-pecl-mcrypt lsphp56-pecl-memcache lsphp56-pecl-memcached lsphp56-pecl-msgpack lsphp56-pecl-msgpack-devel lsphp56-pecl-redis lsphp56-pgsql lsphp56-process lsphp56-pspell lsphp56-recode lsphp56-snmp lsphp56-soap lsphp56-tidy lsphp56-xml lsphp56-xmlrpc lsphp56-zip
Then we need to symlink the lib folder :
ln -s /usr/local/lsws/lsphp56/lib64 /usr/local/lsws/lsphp56/lib
Visit this tutorial :
How to Configure PHP 7.2/7.1/7.0 with OpenLiteSpeed
STEP 4
Firewall configurations :
if you’ve firewaall installed ensure this ports are open :
- 80
- 443
- 8080
- 7080
For Iptables use this commands to open the ports :
iptables -I INPUT -p tcp --dport 80 -j ACCEPT
iptables -I INPUT -p tcp --dport 443 -j ACCEPT
iptables -I INPUT -p tcp --dport 8080 -j ACCEPT
iptables -I INPUT -p tcp --dport 7080 -j ACCEPT
STEP 5
Start OpenLiteSpeed and Login to Dashboard :
To start OpenLiteSpeed:
service lsws start
To stop and restart :
service lsws stop
service lsws restart
Now we need to reset the OpenLiteSpeed admin password :
cd /usr/local/lsws/admin/misc
./admpass.sh
when prompting for username leave it blank eg.:
[root@mysterydata ~]# cd /usr/local/lsws/admin/misc
[root@mysterydata misc]# ./admpass.sh

Please specify the user name of administrator.
This is the user name required to login the administration Web interface.

User name [admin]:

Please specify the administrator's password.
This is the password required to login the administration Web interface.

Password:
Retype password:
Administrator's username/password is updated successfully!
STEP 6
Login to OpenLiteSpeed admin panel :
https://1.2.3.4:7080
replace 1.2.3.4 with your server ip.
STEP 7
Configure Port 80 (http) and 443 (https)
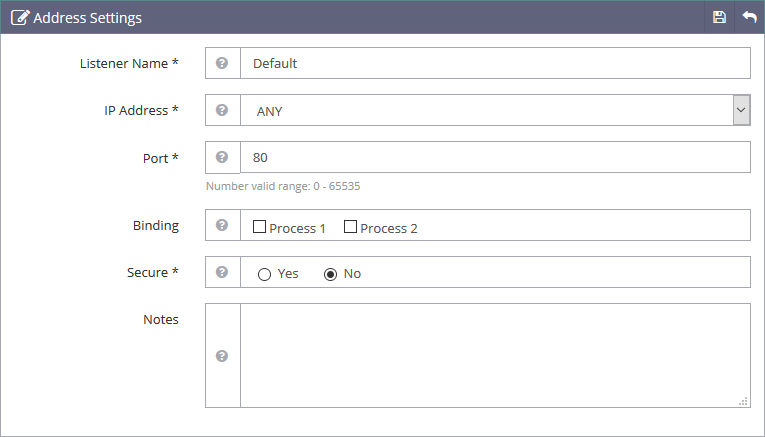
The default http port for openLiteSpeed is 8080, it’s used to receive the client requests. In this step, we will change the port to 80 from the openLiteSpeed management GUI.
On the left side, go to the “Listeners” section to see the listeners configuration. You will see the default listeners with port 8080. Click “view” zoom icon to see details configuration. Now click “Edit”.
IP Address: ANY
Port 80
Change the port to 80 and save the configuration.

For SSL 443 follow this official documentation : https://openlitespeed.org/mediawiki/index.php/Help:SSL_Setup
thats it you’ve successfully installed OpenLiteSpeed